Congratulations and thank you on your purchase of Loftsoft's FMHeaven software synthesiser. This instrument is designed to provide you with a flexible polyphonic software synthesiser based on FM synthesis.
FM synthesis is renowned for it's flexibility and the range of sounds that it can produce. It is particularly suitable for producing bass, pad, electric piano and bell sounds although it is not restricted to these areas!
FMHeaven's feature list includes:
Support for six complex oscillators per voice. Each oscillator can be tuned over a wide range (from 0.5Hz to 20Khz).
A completely flexible modulation matrix allowing any modulation routings to be configured. There are no modulation algorithms to restrict you!
Sixteen complex waveforms per oscillator.
Two multimode 2nd order filters.
Fourteen complex envelopes per voice, allowing independent control of amplitude and frequency for each oscillator as well as two filter envelopes.
Voice parameter morphing allowing realtime modification of many synth parameters using the mod wheel and aftertouch.
Flexible control over the voices, including portamento, mono/poly switching, voice stacking with detune and polyphony limiting.
Multi-timbral operation allowing up to 64 notes across the 16 midi channels.
Complete automation possible from within the VST host.
In the following sections we will be exploring the features of the synthesiser in detail and describing how to get the best results out of this complex and flexbile
synthesiser.
This is a complex synthesiser with many possibilities. In the following sections we will be exploring the features of the synthesiser in detail and describing how to get the best results out of it.
Have fun with your new synth!
The Loftsoft synthesiser team
Sound generation within FMHeaven is based around the FM synthesis method which was made famous by the Yamaha DX range of synthesisers, in particular the DX-7.
The DX range of instruments were the first digital FM synthesisers and were quite different from their contemporaries. At the time of introduction, synthesisers were typically analogue, and based around the subtractive model. In subtractive synthesis oscillators produce harmonically rich waveforms, which are then modified by a range of filters and amplifiers to produce the output sound.
FM synthesis by comparison relies on frequency modulation of one oscillator by another to generate the harmonics in the output waveform. What this means is that the frequency of one oscillator is varied by the frequency of another oscillator. Unlike in a conventional synthesiser where this can be configured using an LFO, the modulating oscillator is configured to be running very high frequencies. The result of this is that distinct overtones are produced in the output of the first oscillator (rather than the modulation appearing as a vibrato type effect).
Although this is possible with an analogue synthesiser, to create predictable effects the oscillator frequency ratios need to be set to very precise reproducible ratios (such as 1:3), and this is the domain of the digital oscillator rather than the analogue one!
Oscillators which are modulated by other oscillators are termed Carriers, and oscillators which modulate other oscillators are termed modulators. In a normal subtractive synthesiser, altering the amplitude of an oscillator simply alters the amplitude at the output. In FM, this is only true for Carrier oscillators. If the alter the amplitude of a Modulator oscillator, you increase the number of harmonics present in the waveform of the carrier oscillator. The effect of this is very much analogous to altering the cutoff frequency of a filter in a subtractive synthesiser, however the tonal variation possible is much more complex.
In FMHeaven, modulation parameters are entered in a modulation matrix. The synthesiser has six oscillators, and each oscillator can modulate any combination of oscillators. The matrix therefore has 36 entries, one for each oscillators modulation setting on each other oscillator. In addition, any combination of oscillators can be set an output volume, allows these oscillators to behave as Carriers. It is possible therefore to configure an oscillator as both a Carrier and a Modulator - it can modulate other oscillators, and it can output its own waveform.
In addition to configuring oscillators to modulate other oscillators, FM has another trick up its sleeve. Oscillators can be set to modulate themselves, and this produces quite interesting changes to the tone of the oscillator.
In FMHeaven, all oscillators have a feedback level specified in the modulation matrix by the diagonal of the matrix.
If you are interested to read further about how FM synthesis, a very technical description can be found in Dave Benson's guide 'Mathematics and Music'. Be warned, this guide is very mathematical in nature! Section 5.10 contains a detailed account of the maths behind FM synthesis. The guide can be found at http://www.math.uga.edu/~djb/math-music.html
FMHeaven is a standard VST instrument, and as such it requires a VST host application to run. The most common VST host applications are Emagic's Logic Audio, and Steinberg's Cubase VST. Both applications are available on both Mac and PC, and include a variety of configurations to suit all needs.
A description of how to load FMHeaven under all VST hosts is beyond the scope of this documentation, and you are advised to consult your VST application documentation for a precise description of how to do this. A brief description is included below on how to configure FMHeaven as a VST instrument under Emagic's Logic.
Within the Logic environment, special instrument channels are provided for either Logic's built-in, or VST instruments. In order for FMHeaven to appear in the VST instrument list, it must be placed in the vstplugins directory (or a subdirectory of vstplugins) before Logic is started.
With the plugin installed, if logic is started and an instrument channel selected in the environment, then the instrument pulldown will include FMHeaven. Selecting FMHeaven will bring up its graphical interface and it will have been automatically wired into the selected instrument channel in the mixer. You can then play midi directly into the instrument by selecting the instrument channel in the arrange window, or you can play recorded sequences through the instrument by assigning the midi data to the instrument channel in the arrange window.
FMHeaven includes 12 banks of 32 sounds in the default sound bank. These cover a wide range of instruments from standard organ and electric piano sounds to a whole collection of pad sounds.
In order to explore the patches, you can select the program to play by either:
Selecting the program control on the FMHeaven GUI and dragging the number up to increase it, and down to decrease it. Similar dragging alters the displayed bank using the bankcontrol.
Selecting the program from the VST host application. For example, selecting a name from the pull down list in the VST Instruments window within Cubase.
Sending a Program Change message to FMHeaven from a controller keyboard.
Note FMHeaven is a multi-timbral synth, so make sure you have the midi channel selected that corresponds to the midi channel you are using. Otherwise you will find that changing the program doesn't change the produced sound!
FMHeaven is able to import DX7 and TX81z sysex messages in various formats to recreate the sound of these classic instruments. The normal bank load controls do not work for this - you need to use the import function. Please refer to the import section later in this document.
The following sections of the document describe in detail each of the controls available on the synthesiser and their effects.
The oscillator section is the heart of the sound generation engine of the synthesiser. In this section the frequencies of the six independent oscillators is chosen and their waveforms.
Each oscillator has a separately numbered section on the screen which contains the following controls:
This shows whether the oscillator has a fixed frequency, or whether the frequency varies across the keyboard.
The numeric display shows the oscillator frequency. If the oscillator is a fixed frequency it shows the frequency in Hz. If the oscillator is set to tracking mode, the display shows the ratio of the oscillator to the natural pitch of the played note. Say a note of pitch 440Hz is played and an oscillator is set to tracking mode with a ratio of 2.0, then the oscillator will play 880Hz.
The Numeric display supports the direct entry of oscillator frequencies by selecting the value and replacing it with the required value.
The rotary controls are used to adjust the oscillator frequency. The larger control is the major frequency adjustment whilst the smaller control is the minor frequency adjustment. The oscillator ranges are substantial and are indicated below:
|
|
Lowest |
Highest |
|
Fixed Mode |
0.4Hz |
27Khz |
|
Tracking Mode |
0.004 times |
271 times |
In addition, a 0Hz mode is supported in both fixed and tracking modes.
Note The 0Hz mode is particularly useful as an oscillator set to 0Hz can act as a waveshaper when configured as a carrier waveform.
Each oscillator can use one of sixteen different waveforms. By clicking the waveform display the oscillator will cycle through the sixteen different shapes available. They vary from a simple sine wave to complex saw and square waveform options.
The modulation matrix is where the FM modulations are configured for the oscillators. There are six rows, corresponding to the six oscillators, and each row shows for the named oscillator which oscillators are modulating it, and by how much. Empty squares indicate no modulation.
For example, in the matrix above oscillator 1 is being modulated by oscillators 2 and 3, oscillator 4 is being modulated by oscillator 1, and oscillator 5 is being modulated by oscillator 4.
The diagonal of the modulation matrix indicates self modulation, where an oscillator is being modulated by itself.
Note By turning an oscillator's self modulation up high, the oscillator becomes unstable and produces noise. This is an easy way of generating a noise source within a patch using a single oscillator.
In order to enter values into the modulation matrix, you simply click and drag on the desired square in the matrix. The displayed number will increment or decrement to follow your selection. The modulation amount is from 0 to 100, and the control has been calibrated so that low values offer a very small amount of modulation whilst the effect of increasing the value becomes quite dramatic towards the top end of the control range.
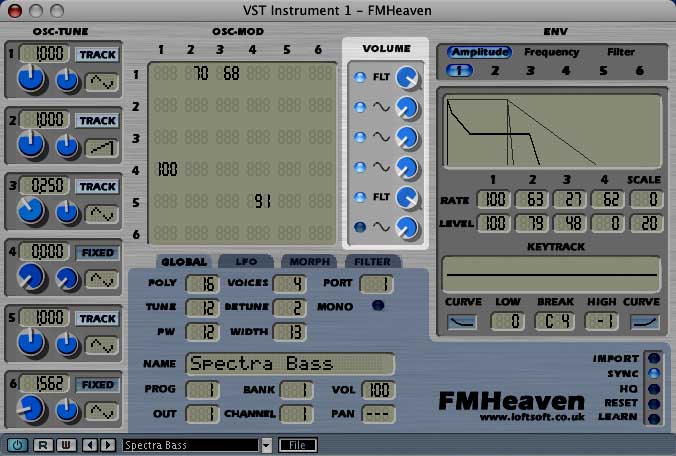
The volume section controls how the different oscillators in the synthesiser contribute to the output sound of the voice. There are three controls in this section per oscillator.
The volume control selects the volume level for the oscillator. The volume control is applied after the modulation matrix, and routes the selected level of the oscillator to the synth output.
Note It is common for an oscillator to be set to modulate another oscillator, but for its output to not directly appear in the output (its volume set to zero). You can still hear the effect of this oscillator, it alters the harmonics of the modulated oscillator.
This button lights blue when the oscillator is enabled within the patch.
Note Disabling oscillators can be used to reduce the CPU load on your system. FMHeaven is designed to take advantage of disabled oscillators and to run a more efficient algorithm if the higher numbered oscillators are inactive. FMHeaven has optimised algotithms for only 2 and 4 oscillators active which offer significant performance savings.
The oscillator output routing control allows the oscillator output to be sent directly to the output, inverted, or sent to the filter bus. By clicking on the control it toggles through the three options.
Note PulseWidth Modulation effects can be generated using inverted waveforms. The saw wave will produce a PWM square wave if added to another oscillator running the same wave inverted.
FMHeaven includes an advanced four stage envelope design. Each oscillator has separate envelopes for amplitude and frequency.
In addition, each filter has a separate filter envelope. The envelopes respond to key velocity, and note pitch and can be configured to vary their rates across the range of the keyboard.
Envelopes are very important in FM, since if an oscillator modulates another oscillator, changing the envelope of the modulating oscillator causes a change in the tone of the sound, not it's output volume. Very slow rising/decaying envelopes can be used to great effect to alter the tone of a note, creating movement in the sound.
The top selection control chooses between the display of the Amplitude, Frequency or Filter envelopes. If Amplitude or Frequency is selected, the indicator below allows the selection of which of the 6 envelopes to edit. When Filter is selected, two envelopes are available for editing.
The four envelope stages allow a rate and a level to be specified. Higher rates gives faster stage times. The level control is from 0 to 100, and for the amplitude envelope 100 is maximum amplitude. For the frequency envelopes, value 50 is natural pitch, and the total range is around +/- 3 octaves.
A rate and level scaling control is provided. Rate scaling affects the rates of the envelopes allowing notes at the higher end of the keyboard to be faster than at the bottom of the keyboard if enabled. There are eight settings of rate scaling from 0 (off) to 7 (maximum).
Level scaling controls how the envelopes respond to key velocity. With the scaling set to 0, the envelopes are not affected by key velocity, but at higher settings there is a marked difference in level with key velocity. Higher velocities produce louder envelopes.
The keytracking section allows the envelope level to vary with the note played on the keyboard. Two curves are provided (linear and exponential) allowing the rates of change of level to be controls across the keyboard. Separate levels and provided above and below a break point so it is possible to configure a flat level up to a certain key, and then say a decrease in level above this note.
Keytracking cannot increase the level of the envelope above the maximum value of 100. It is common to therefore determine the loudest note on the keyboard, set this as the break note and to use negative keytracking levels on either side of this to attenuate rather than boost the envelope level.
Note Keytracking is often used to reduce the level of modulation on a program at the top of the keyboard range. FM traditionally produces very high levels of the top harmonics and so it is prone to aliasing distortion when played at the top end of the keyboard. To reduce this effect you can set a sharp drop off of envelope levels above a suitable break point.
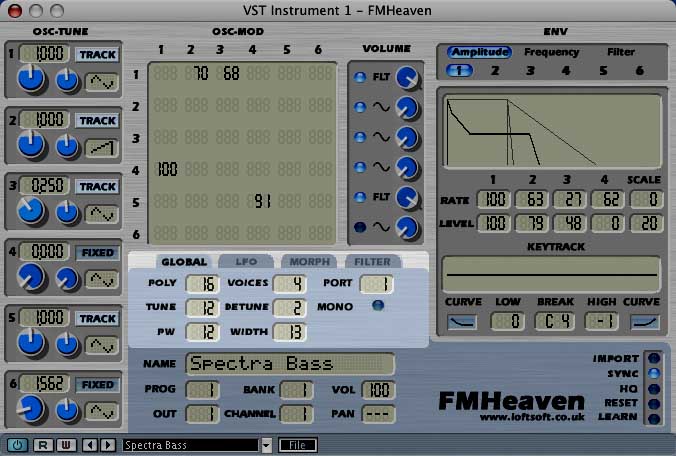
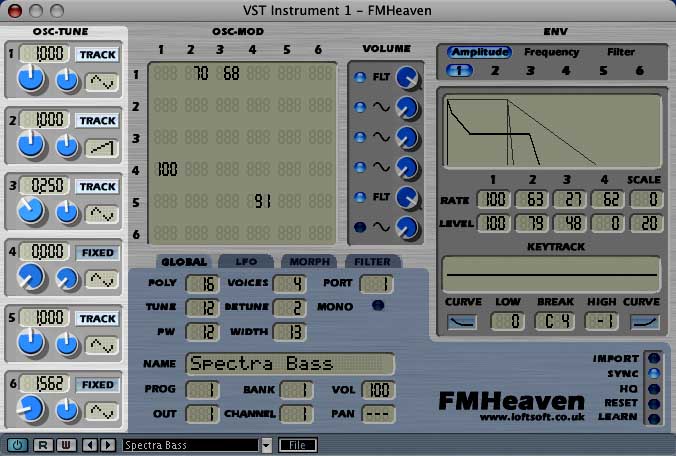
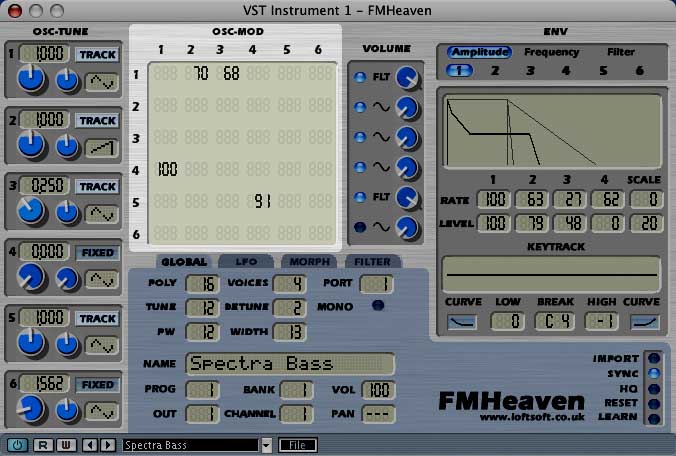
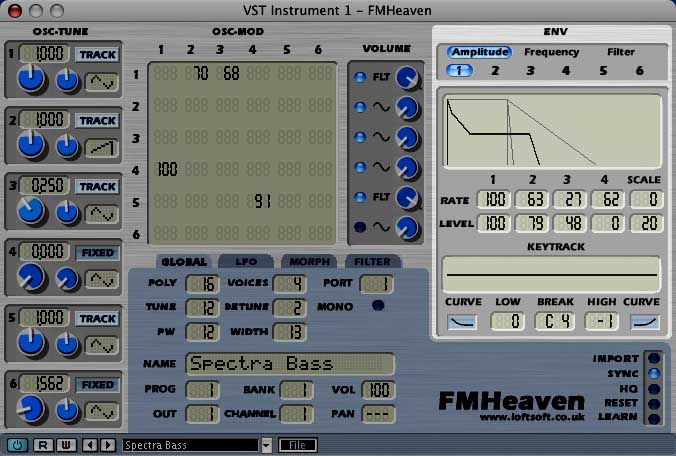
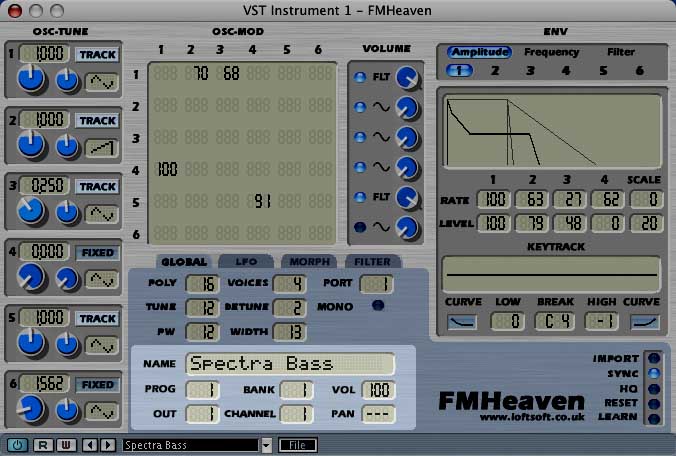
The Global section contains controls which affect the way the program reacts to incoming midi note messages. The global panel is selected by clicking on the Global tab above the panel section.
FMHeaven is a polyphonic, multi-timbral synth, supporting up to 64 active voices. The Polyphony control is used to limit how many of these voices can be used by the program. It should be noted that this does not indicate how many notes can be played by the program, but it indicates the maximum number of voices which can be used. In the example program above, two voices are used per note (the Voices control is set to 2) so a maximum of 8 notes can be played before voice stealing occurs since polyphony is limited to 16.
The tune control alters the overall tuning of the instrument in semitone steps. Tuning can be set +/- 36 semitones.
The Pitch Wheel control affects the range of the pitch wheel in semitones. Values can be between 0 and 12 semitones.
Using the voice thickening controls a range of effects can be created from wide pseudo-stereo effects to detuned pad sounds. The voices control indicates how many actual FMHeaven voices are created when a note on is received. Values can be between 1 and 16. Be aware that doubling the number of voices doubles the CPU overhead of playing a note! In normal use values of 2 to 4 are suitable for almost every situation. Certain 'wall of sound' lead patches do improve the more voices used however.
The detune and width controls affect the tuning and stereo positions of the playing voices. Detune affects how detuned the additional voices are from the default pitch of the instrument. Both fixed and tracking frequencies are affected, giving a warm chorus effect at low settings rising to detuned effects at the top of the range.
The width control specifies how the voices are positioned relative to the pan position for the active channel. As the width is increased the voices are spread across the stereo image further apart. With a maximum setting of 100, two voices are panned hard left and right.
Note When using multiple voices various effects can be achieved. It should be noted that the random LFO setting is random for each playing voice, so by setting a slight amount of LFO depth, random detuning effects can be created. In addition, the oscillator sync control can be used to remove phase coherency of the playing voices giving a pseudo-stereo effect. By not turning off oscillator sync, hard phasing sounds can be produced with multiple voices.
The Mono control selects between the mono and polyphonic mode. When enabled, only one note can be played at a time by the program. If a second note is played whilst another is active the pitch of the playing note jumps to the new note value.
The portamento control, when applied, gives a pitch slide from the last played note to any new notes played on the channel. This effect works in both mono and polyphonic modes, and the range goes from very slight changes to the attack of the note to slow ramping of the note frequency.
For those wondering, the pitch slide is exponential rather than linear, and so gives a constant rate of slide in semitones no matter how many notes are being spanned.
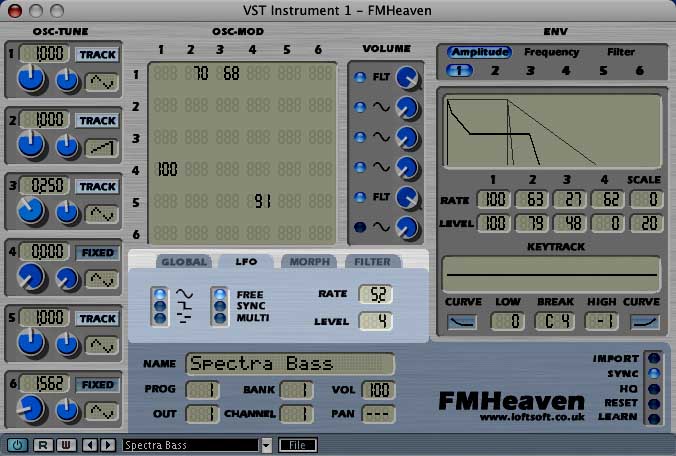
The LFO section controls the single LFO available within FMHeaven. The LFO effect applies a pitch bend (vibrato) to playing notes.
The LFO waveform control selects the shape of the LFO. Three options are available, sine wave, square wave and sample/hold. The sample/hold wave is a random waveform which gives a value which is held for the LFO period and then takes on a random value.
The LFO mode changes how the LFO appears to multiple voices playing within the synth engine. The Free mode means that the LFO runs free across multiple voices, so if a slow vibrato is applied to the program, the same amount of pitch bend is applied to all playing notes.
In Sync mode, each time a note is started the LFO waveform is reset to the start position, but again the same LFO applies to all playing voices.
In Multi mode, each voice appears to have an independent LFO, which is Synced at note start.
The LFO Rate affects the speed of the LFO. It is limited to a range of 0Hz to 20Hz. The Level affects how much vibrato is applied to the program. At maximum setting a whole octave of vibrato is applied, which is unlikely to be necessary except for the most extreme conditions!
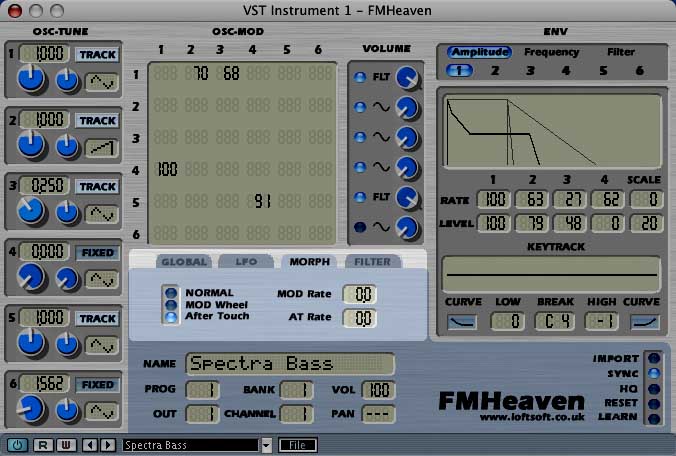
The morph section provides a unique feature to the synth, the ability to vary almost any program parameter real-time using either the mod wheel or channel aftertouch performance controls.
The basic idea is simple - for each program parameter which supports morphing, the program records not just the default value, but a value for the parameter when mod wheel is applied, and a value for when aftertouch is applied.
When a note is played, the synthesis engine determines the synthesis parameters to use by consulting the current value of the modulation and aftertouch controls and 'interpolating' the values for each parameter from the default, mod, and aftertouch values.
So what does this interpolation do? Consider a program which has the volume for the first oscillator set to 50% for the default value, and 80% for the mod wheel value. If the modulation wheel is off, new notes (and playing notes for that matter) will get a volume of 50%. As the modulation wheel is increased to its full value, the volume will increase steadily from 50% to 80% (as defined in the morph).
The real power of morphing is the fact that the morph can vary very many parameters simultaneously.
Most synth parameters are affected by morphing. This includes the oscillator frequencies, modulation settings and output volumes. The following lists the parameters which cannot be morphed:
Envelope parameters
Global parameters
LFO mode
Some controls are morphed and are not interpolated. These are:
Oscillator waveform
Oscillator mode (Fixed, Tracking)
Oscillator mode (muted, inverted)
LFO waveform
To configure the program morph, select the morph tab. The panel includes three controls, the first of which is the morph mode control. This parameter defaults to NORMAL, and in this mode the panel displays the control parameters when no morph is applied (the default values). When MOD Wheel or After Touch is selected, the panel displays the parameters as they will appear when the modulation or aftertouch controls are used on the program. By default, no parameters will change (since by default every un-morphed parameter retails the default value).
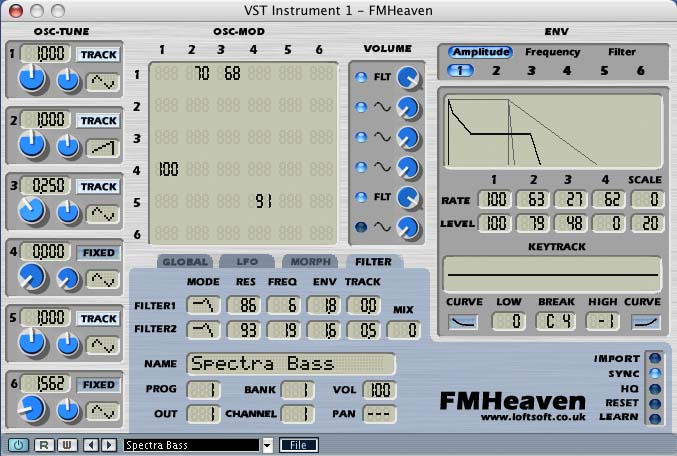
Program morphing is best described using an example. The first patch in the default bank (Spectra Bass) uses modulating wheel morphing and aftertouch morphing to alter the tone of the patch. It does this by altering the filter settings. Selecting different morphing modes then viewing the filter panel shows different filter settings.
Note When altering synth parameters, if you are not getting the expected results make sure you are not altering the parameters for a different morph mode than you are expecting! Select the morph tab and make sure you are in NORMAL mode if you are experiencing strange behaviour!
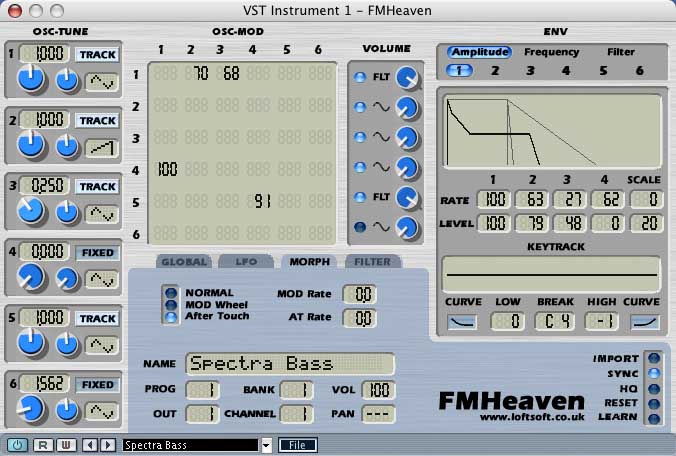
Spectra Bass program showing mod wheel morph values
The morph rate controls will normally be set to 0. They represent a rise time for the morph and aftertouch controls to smooth parameter changes when using the synth live. Without rate smoothing, if the modulation wheel is quickly moved between two values it is possible to hear an audible click as a discontinuity is heard between the normal and morphed parameter values.
The morph rate smooths these parameter changes by applying them over a period of time. There is a significant performance cost of doing this so it is only recommended for situations where the discontinuity cannot be fixed by inserting more parameter messages (e.g. live).
Note When recording morph changes into a sequencer, rather than simply recording the modulation wheel and aftertouch controllers from your master keyboard, it is recommended that these parameters are edited as continuous envelopes within your sequencer. Under logic, for example, use the hyper editor to draw envelopes using these controls. The sequencer will send very dense control information to the instrument giving a super smooth morph.

The filter section describes the settings for the two multimode filters which are active for each voice. Oscillators who have 'FLT' selected for their routing are fed through the filters on their way to the output bus. Only these oscillators are affected.
Each filter can be set to either Low Pass or High Pass operation, and they are digitally modelled 2nd order filters (12db per octave). They include feedback (resonance) and have an associated cutoff envelope which can be used to modify the filter cutoff frequency over time.
The mode control selects LP or HP operation for each filter. The graphic indicates the filter mode selected.
Filter resonance applies feedback around the filter (feeding some of the filter output back into the filter input). This leads to a prominent peak in the filter response at the cutoff frequency. Increasing resonance increases this emphasis.
This control sets the cutoff frequency for the filter. The cutoff value can be accurately tuned, since the actual cutoff frequency follows midi note values (so a cutoff of 60 is the same as middle C).
This control defines how much effect the filter envelope has on the cutoff frequency of this filter. A value of 0 indicates no effect, whilst both positive and negative values are supported.
This control allows the cutoff frequency to be modified by the key being played on the keyboard. No matter what the track value is set to, middle C will use the filter frequency defined as defined, with higher and lower keys moving the cutoff frequency by the indicated number of semitones per key. So, for example, if the track is set to 1, then for each semitone above middle C, the cutoff frequency will be modified by 1 (and hence it will correctly track the depressed key).
This control changes the configuration of the filters between a series arrangement (when set to 0) to a parallel arrangement (when set to 100). In between values will mix the series and parallel modes of operation.
The program section allows the selection and naming of programs within the synthesiser program banks. FMHeaven contains 12 program banks of 32 voices each.
Since FMHeaven is multi-timbral, the synthesiser can respond to note requests on different channels by playing different programs. The Channel selection control alters which midi channel you are adjusting settings for. Changing this control will alter the display to reflect the program, volume and pan settings for the selected channel.
Note A common problem is displaying and changing the settings for one channel whilst sending notes to the synthesiser on a different midi channel and being surprised that the sound is not affected. Make sure that the channel you have selected in your VST host is sending midi channels on the channel you are adjusting on the display.
Programs are organised into banks of 32 programs. To select a particular program you will need to adjust the program and the bank to select the particular program you require.
The program name gets displayed in this control. If you click on the name you can edit it.
These controls affect the channel volume and pan position. These controls are for the channel itself, not for the program currently active on this channel. They correspond to the standard midi CC controller numbers 7 and 10 (for pan and volume respectively), and they will respond to these controls if received.
The button section at the lower right of the screen controls various special aspects of the synthesiser. These are described below
FMHeaven is able to import settings from the DX7 and TX81z synthesiser SYSEX messages. FMHeaven maps the settings to its own controls to recreate the sounds from the original synthesiser.
To import a sound, the SYSEX message from the DX7 or TX81z needs to be saved to a file on your computer. Then, to import it, press the import button and select the file from the file dialog.
If the import is successful, the currently selected program bank will be erased and replaced with the 32 voices imported from the SYSEX file.
The import function works with a variety of file formats including raw SYSEX data. These files are available from many web sites on the internet, and typically end in .syx or .dx7
The sync mode determines the behaviour of the six oscillators on receipt of a note on. When a note on is received, if oscillator sync is enabled, the oscillators are all reset to the same starting position (in other words, the same phase). When oscillator sync is disabled the phase is not reset for the oscillators.
By disabling oscillator sync, slight tonal variations are introduced to the sound of the voice which can make it sound more authentic. In addition, some programs use this feature to create significant tonal variations on consecutive notes as an effect in itself.
Note Oscillator sync has a significant effect on the behaviour of the synthesiser when multiple detuned voices are used. When oscillators are synced, strong phasing effects are generated by detuned voices. By disabling the sync, a rich detuned effect is created. Combining multiple voices with width, and disabling oscillator sync produces a wide pseudo-stereo effect.
FMHeaven can operate in two distinct modes - normal and High Quality. The high quality mode improves the quality of the oscillator model used, significantly reducing aliasing noise in the synthesiser. This is achieved at some additional CPU overhead. The normal mode is suitable for most situations although when using some very low frequency voices High Quality mode will give a cleaner sound.
The Reset button does what it says - it silences any playing voices.
FMHeaven can be configured to assign any standard CC controller to any control on the screen. This is useful for people with hardware control surfaces. The learn mode, when enabled, allows assignments between CCs and controls to be configured. When disabled, received CCs control their assigned controls.
To assign a CC to a control, the following steps are required:
1. Enable learn mode
2. Move the controller you want to assign
3. Transmit a CC to the synthesiser - the assigned controller will update to the received value
4. Disable learn mode to save the assignment
If multiple controllers are to be assigned, steps 2 and 3 can be repeated for each control.